25 Sticker Crafts Toddlers Can Do All By Themselves (No Help Needed)
Yousuf figured out sticker crafts before he figured out how to tie his shoes. He is five and absolutely obsessed, and honestly watching him just go to town on a piece of paper with a sheet of dot stickers is kind of the best thing ever. That’s how I got into making this list — we kept finding new ways to use stickers and I wanted to write them all down before I forgot.
What I really like about sticker crafts for toddlers is that they can actually do them. Like, independently. Most crafts for little kids still need a grown-up right there cutting things or holding stuff together, but with stickers, a toddler can just sit down and make something real. You peel, you stick, and it looks cool. That’s kind of the whole thing. A lot of these crafts on this list work with regular sticker sheets you can get anywhere — dot stickers, star stickers, foam stickers, even just the cheap ones from the dollar section. I also tried a few of these using paper plate crafts as the base, which works really well.
Some of these are super simple, like just sticking dots in a pattern on cardstock — Yousuf can do those completely on his own without any help from me or Mom. A few of the ones further down the list are a little more involved, like the wax paper sun catcher or the sticker resist watercolor one. Those ones are more fun for kids my age or for toddlers with an older sibling helping out. I tried to be honest about which ones need some grown-up setup so you know what to expect before you start.
Most of these take somewhere between ten minutes and half an hour, which is about the perfect amount of time before a toddler loses interest. A few need a little drying time if there’s paint involved, so just plan for that. None of them need fancy supplies — mostly just stickers, paper, cardboard, and recycled stuff from around your house. Okay, let’s get into it.
Craft Ideas Worth Making
25. Sticker Dot Rainbow on White Cardstock
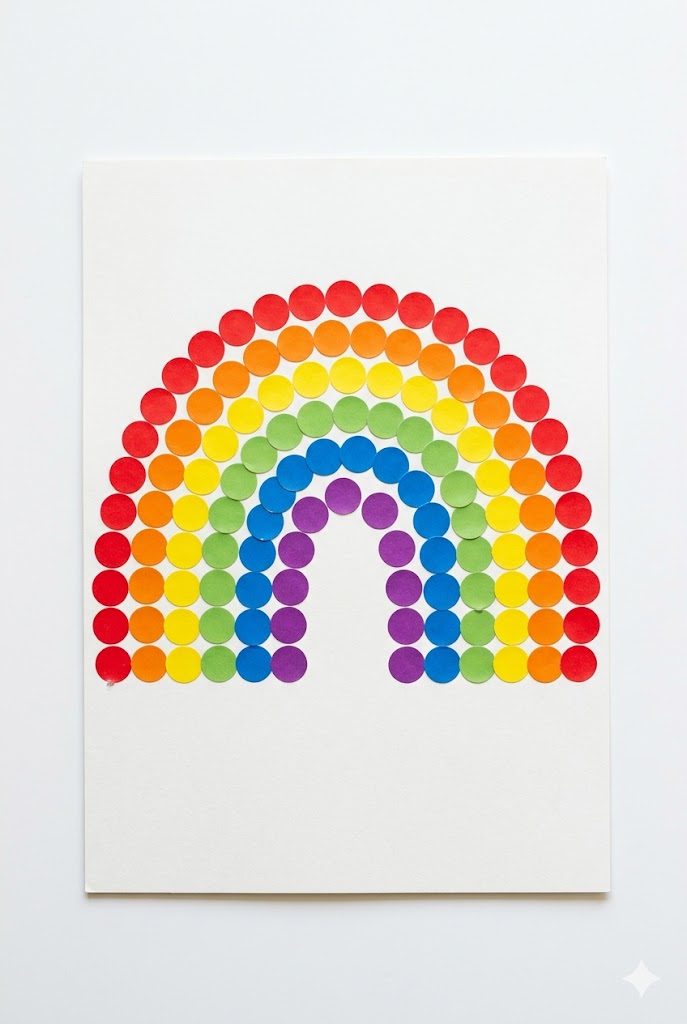
Round dot stickers in rainbow colors are basically made for this craft. You draw the arc lines first, then your toddler fills them in with stickers — and the whole thing looks really satisfying when it’s done.
Supplies
- 1 sheet of white cardstock (regular printer paper works too)
- Round dot stickers in red, orange, yellow, green, blue, and purple (about 3/4 inch wide)
- A pencil or marker to pre-draw the arc lines
How to Make It
- Use a pencil or marker to draw 6 curved arc lines on the white cardstock, stacked like a rainbow. Make them wide enough so there’s room for a row of stickers on each arc.
- Write or trace the color order along the side so your toddler knows which sticker goes on which line — red at the top, then orange, yellow, green, blue, purple at the bottom.
- Let your toddler peel and stick the dot stickers along each arc line, one color per row. It’s okay if they go a little outside the lines.
- Keep going until all six arcs are filled in with stickers.
- Optional: draw a sun in one corner and some clouds with a white crayon or marker when the stickers are all on.
24. Toilet Paper Roll Sticker Butterfly Wings
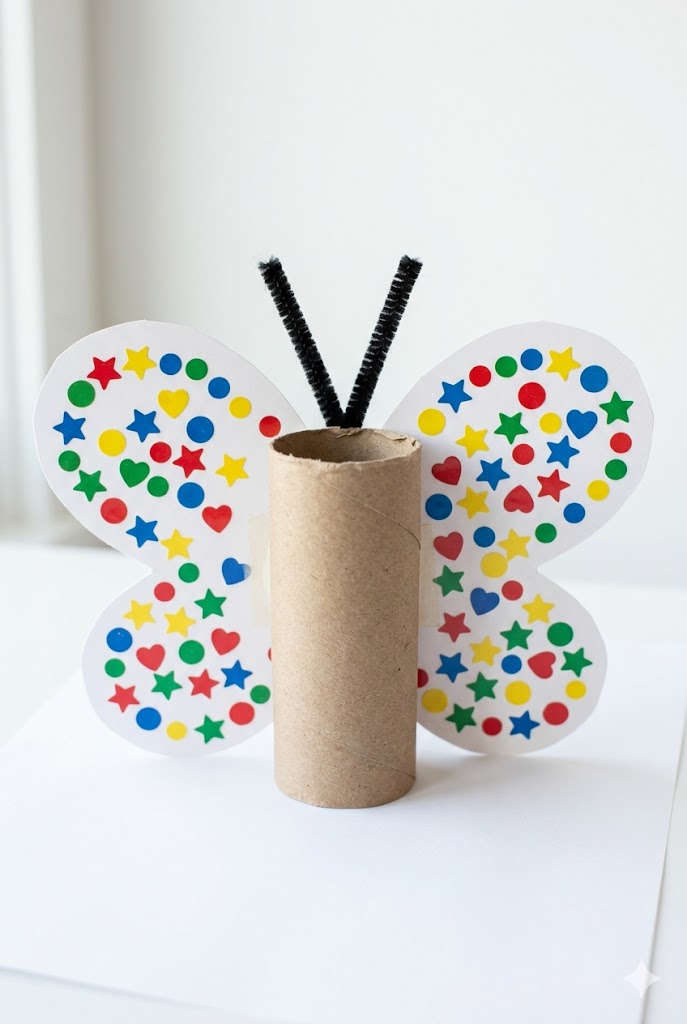
Yousuf made this one on his own and was genuinely proud of it — he kept showing everyone the butterfly he made. The toilet paper roll becomes the butterfly body and the paper wings are what your toddler gets to decorate with stickers however they want.
Supplies
- 1 empty toilet paper roll
- 1 sheet of white or light-colored cardstock, cut into a large figure-8 or two oval shapes for wings (a grown-up can pre-cut these)
- Assorted stickers — star stickers, heart stickers, dot stickers, whatever you have
- 2 black pipe cleaners for antennae
- Glue stick or tape
- Markers for adding details (optional)
How to Make It
- Pre-cut the wings from cardstock into a figure-8 shape or two large ovals. This part is for the grown-up because scissors are tricky.
- Let your toddler cover both wings with stickers however they like — no rules on placement.
- Fold the wings slightly in the middle so they curve a little, then tape or glue them to the back of the toilet paper roll.
- Bend two black pipe cleaners into a V shape and tuck them inside the top of the toilet paper roll so they stick up like antennae.
- Set the butterfly upright and let it dry if you used glue.
23. Paper Bag Sticker Lunch Monster
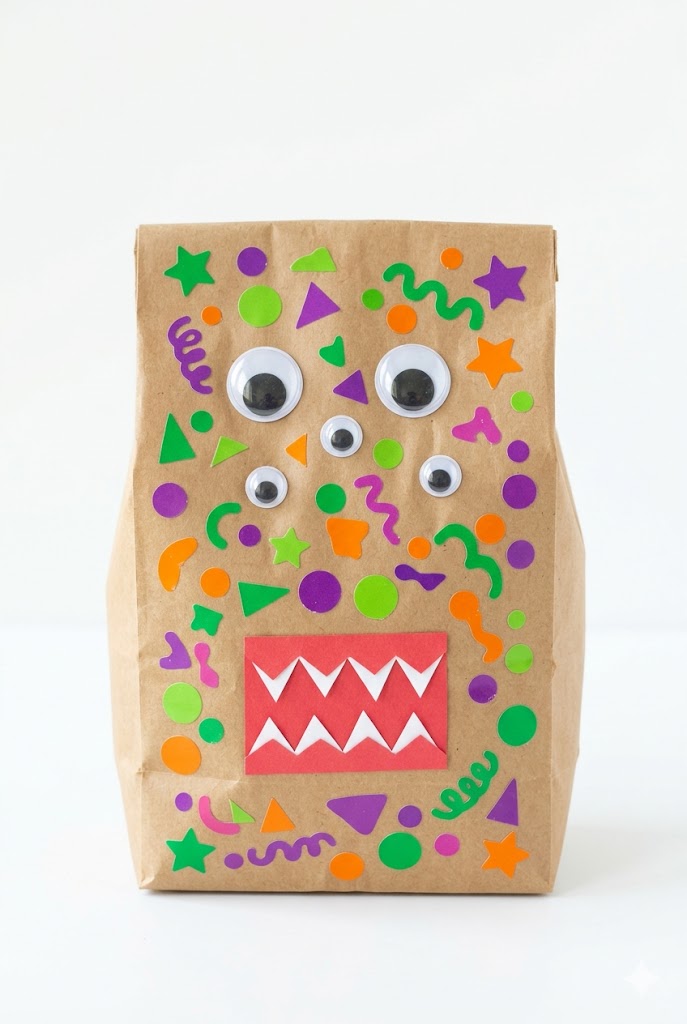
A plain brown paper lunch bag turns into a pretty hilarious monster when you let a toddler go wild with stickers and googly eyes. Every single one comes out looking different, which is kind of the best part.
Supplies
- 1 brown paper lunch bag
- 3 to 5 large googly eyes (assorted sizes, 1/2 inch to 1 inch)
- Assorted sticker shapes — monster-friendly colors like green, purple, orange work great
- 1 sheet of red construction paper cut into a jagged mouth shape (grown-up prep)
- Glue stick
- Green or purple washable markers for extra monster details (optional)
How to Make It
- A grown-up pre-cuts a jagged zigzag mouth shape from the red construction paper and sets it aside.
- Let your toddler cover the front of the paper bag with stickers — no order, just wherever they want them.
- Help your toddler glue the red jagged mouth near the bottom of the bag front.
- Let your toddler pick where the googly eyes go and glue them on — three eyes, five eyes, whatever they decide. Monsters don’t have rules.
- Optional: add some squiggly marker lines for extra monster texture once the glue dries.
- Stuff the bag loosely with crumpled newspaper so the monster stands up, or leave it flat to hang on the wall.
22. Foam Sheet Sticker Crown Toddlers Wear
Foam sheets are really good for crowns because they’re bendy, they hold stickers perfectly, and they don’t get all floppy like paper does. Once your toddler sticks everything on, you just measure it around their head and fasten it — they can wear it right away.
Supplies
- 1 sheet of yellow or gold foam (the kind from the dollar store craft section)
- Scissors for a grown-up to cut the crown zigzag points along the top edge
- Gem stickers, star stickers, or any sparkly sticker set
- Stapler or tape to fasten the crown into a circle once sized
How to Make It
- A grown-up cuts the foam sheet into a long strip about 3 inches wide, then cuts zigzag points along one long edge to make the crown shape.
- Give the foam strip to your toddler and let them press stickers all over the flat front — gem stickers look especially good on gold or yellow foam.
- Once they’re happy with their design, wrap the strip around the toddler’s head to measure the right size, then fasten the ends together with a stapler or a strip of tape on the inside.
- Put the crown on and let them feel very official about it.
21. Paper Plate Sticker Night Sky Scene
This one starts with painting the plate dark blue or black first — which is the fun messy part — and then once it dries, your toddler fills the “sky” with star stickers and moon stickers. It ends up looking genuinely cool on the wall.
Supplies
- 1 white paper plate (standard size)
- Dark blue or black washable tempera paint
- A wide foam brush or regular paintbrush
- Gold and silver star stickers (any size — a mix of big and small looks great)
- 1 crescent moon sticker or white foam moon shape with sticky back (or cut one from white foam)
- White dot stickers for extra small stars (optional)
How to Make It
- Let your toddler paint the entire surface of the paper plate with dark blue or black tempera paint using the foam brush. It’s okay if it’s a little uneven — that actually looks more like a real night sky.
- Set the plate flat and let it dry completely. This usually takes about 20-30 minutes.
- Once the paint is dry, let your toddler press gold and silver star stickers all over the plate wherever they want.
- Add the crescent moon sticker somewhere near the top or middle.
- Add white dot stickers as tiny extra stars if you have them.
- Hang it on the wall with a piece of tape or a hole punched at the top with string.
20. Popsicle Stick Sticker Picture Frame
Four popsicle sticks glued into a square makes a frame that’s the perfect size for a small photo — and then stickers make it look a hundred times better. Mom helped me line up the sticks straight the first time I made one of these, because getting them perfectly square is a little tricky.
Supplies
- 4 large popsicle sticks (the wide ones, also called craft sticks)
- White craft glue or a glue gun (grown-up uses the glue gun)
- Assorted small stickers — hearts, stars, flowers, dots in any colors
- 1 small photo printed at wallet size, or a drawing that fits inside the frame
- A small piece of cardboard cut the same size as the frame for backing (optional)
- A strip of tape or ribbon for hanging on the wall
How to Make It
- Lay two popsicle sticks parallel to each other, then place two more across the top and bottom to form a square frame. A grown-up glues the corners together with craft glue or a hot glue gun and lets it set.
- Once the frame is dry and solid, let your toddler press stickers all over the four popsicle sticks — cover them as much or as little as they like.
- Slide the small photo or drawing behind the frame and tape it to the back.
- Add a cardboard backing piece for stability if you have one.
- Tape a strip of ribbon to the back top for hanging, or prop it up on a shelf.
19. Recycled Cardboard Sticker Rocket Ship
Cardboard boxes from packages are actually perfect for this — you cut the rocket shape out and then the toddler does the fun part, which is covering it in stickers and making it look like it’s ready for space. The thicker the cardboard, the better it stands up on its own.
Supplies
- 1 piece of corrugated cardboard from a recycled box, at least 8 inches by 12 inches
- Scissors or a craft knife for a grown-up to cut the rocket shape
- Red, orange, and yellow construction paper triangles for the flames (pre-cut by grown-up)
- Star stickers, circle dot stickers, and any space-themed stickers you have
- Silver or metallic stickers for the windows and details (optional)
- Tape or glue stick to attach the paper flames to the bottom
How to Make It
- A grown-up draws and cuts a rocket ship silhouette from the cardboard — a tall rectangle body with a triangular nose cone and two small fin triangles at the bottom sides.
- A grown-up also cuts flame shapes from red, orange, and yellow construction paper and tapes or glues them to the bottom of the rocket so they hang below the fins.
- Let your toddler go wild pressing stickers all over the cardboard rocket body — star stickers, dot stickers, any colors they like.
- Add a silver or metallic circle sticker for the rocket window if you have one.
- Prop the rocket against a wall to display, or punch a hole at the top and hang it with string.
18. Sticker Mosaic Flower on Black Paper
Black paper makes every single sticker color pop way more than white paper does — and when you use tiny dot stickers to fill in a flower outline, it actually looks like a real mosaic. The contrast is really cool and it’s honestly impressive for something a toddler can do.
Supplies
- 1 sheet of black cardstock (regular black construction paper works too)
- Small round dot stickers in bright colors — pink, yellow, orange, red, and green work well
- A white crayon or white gel pen to draw the flower outline on the black paper (grown-up can pre-draw this)
- Optional: a few larger oval or petal-shaped stickers for the outer petals
How to Make It
- Use a white crayon or gel pen to draw a simple large flower outline on the black paper — a circle center with 6 to 8 oval petals around it and a stem with two leaves. Make the outlines thick and clear so your toddler can see them.
- Show your toddler how to fill the circle center with yellow dot stickers, pressing them close together so not much black shows through.
- Let them fill each petal section with pink or red dot stickers, and the stem and leaves with green stickers.
- Work one section at a time so it doesn’t get confusing — center first, then petals, then stem.
- Once all sections are filled in, hold it up and look at how much the colors pop against the black background.
17. Wax Paper Sticker Sun Catcher Window
Sun catchers are one of those crafts that look way more impressive than they are to make. You stick colorful stickers onto wax paper, tape it to a window, and when the light comes through it looks really cool — like a little stained glass thing.
Toddlers can do almost all of this by themselves because stickers are the main part. The only thing a grown-up needs to do is tape it to the window at the end.
Supplies
- 2 sheets of wax paper (about 8×10 inches each)
- Transparent or translucent stickers in assorted colors (star, circle, heart shapes work best)
- Clear tape or painter’s tape
- Scissors (for trimming edges — adult help)
How to Make It
- Lay one sheet of wax paper flat on the table.
- Peel stickers and press them all over the wax paper — overlap them, mix colors, fill it up.
- Place the second sheet of wax paper on top and press down gently so it sandwiches the stickers.
- Ask a grown-up to trim any rough edges if needed.
- Tape the finished sun catcher to a sunny window and watch the colors glow.
16. Paper Cup Sticker Hot Air Balloon
This one is really cute and toddlers go absolutely wild for it. You decorate a paper cup with stickers to make it look like a hot air balloon basket, then attach a balloon on top. Yousuf made one of these and kept pretending it was flying around the room.
Supplies
How to Make It
- Let the toddler cover the outside of the paper cup with stickers however they like.
- Ask a grown-up to inflate the balloon and tie it off.
- Tape four pieces of string evenly around the rim of the cup, spacing them out.
- Gather the other ends of the strings and tie or tape them around the tied end of the balloon.
- Hang it from the ceiling or a doorway with an extra piece of string, or just hold it up and pretend to fly.
15. Sticker Collage on Wooden Craft Stick
Popsicle sticks are kind of tiny, which makes this craft a really good fine motor practice for toddlers — they have to peel small stickers and stick them onto a narrow surface. The finished sticks look like little decorated wands or bookmarks.
Supplies
- 5-6 large wooden craft sticks (regular popsicle stick size)
- Small sticker sheets — dots, stars, smiley faces, hearts
- Markers in assorted colors (optional)
- Clear-drying craft glue or Mod Podge (optional, to seal the stickers)
How to Make It
- Lay the craft sticks flat on the table.
- Let the toddler peel stickers and press them along each stick — overlapping is totally fine and looks cool.
- If they want, use markers to color any plain wood areas between stickers.
- Optional: brush a thin coat of Mod Podge or craft glue over the stickers to seal them and make the sticks shiny.
- Let dry completely before using as bookmarks, wands, or decoration.
14. Brown Paper Bag Sticker Gift Wrap
This is one of those crafts that’s actually useful, which I love. You take a plain brown paper bag, let the toddler go wild with stickers all over it, and now you have a really cute custom gift bag. Way more personal than one from the store.
Supplies
- 1 brown paper lunch bag or small brown gift bag with handles
- Assorted sticker sheets — seasonal shapes, letters, animals, dots, stars
- Markers in red, blue, yellow, and green (optional, for drawing between stickers)
- Tissue paper in 2-3 colors for stuffing the top (optional)
How to Make It
- Open the paper bag and stand it upright so it holds its shape.
- Let the toddler peel and press stickers all over the outside of the bag — front, back, and sides.
- If they want, use markers to add scribbles, dots, or lines between the stickers.
- Once the outside is decorated, place the gift inside.
- Scrunch up tissue paper and tuck it in the top of the bag so it puffs out.
13. Tissue Box Sticker Monster Face
Once a tissue box is empty, don’t throw it away — it’s actually a really good craft base. The opening at the top becomes the monster’s mouth, and toddlers use stickers to add eyes, teeth, spots, and whatever else makes their monster look scary or silly.
Supplies
- 1 empty rectangular tissue box (standard size)
- Large googly eye stickers (or regular googly eyes and a glue stick)
- Assorted sticker shapes for decoration — dots, triangles, zigzag borders
- Markers in black, green, purple, and orange
- Optional: green or purple paint to cover the box first (let dry before stickering)
How to Make It
- If painting first, cover the outside of the tissue box in green or purple paint and let it dry completely — about 30 minutes.
- Press two large googly eye stickers above the tissue opening on the front of the box.
- Use a black marker to draw teeth around the inside edge of the tissue opening to make it look like a monster mouth.
- Let the toddler add dot stickers, triangle stickers, and zigzag border stickers all over the sides of the box for the monster’s spots and patterns.
- Use markers to add nostrils, eyebrows, or extra details.
12. Bubble Wrap Print Sticker Animal Art
Okay this one has a painting step, but the sticker part is what ties it all together. You press bubble wrap in paint to make a textured stamped background that looks like scales or spots, then let it dry and add animal stickers on top. The result looks really cool — almost like a jungle scene.
Supplies
- 1 sheet of white cardstock (8.5×11 inches)
- A small piece of bubble wrap (about 6×6 inches)
- Green and blue washable tempera paint
- A shallow tray or plate for the paint
- Animal stickers — lions, elephants, frogs, birds
- Black marker (optional, for outlines)
How to Make It
- Pour green paint into a shallow tray. Press the bubble wrap bubble-side down into the paint.
- Stamp the bubble wrap firmly onto the white cardstock, pressing all over to create a bumpy green texture. Repeat with blue paint in a different section to make sky or water.
- Let the paint dry completely — this takes about 20 minutes.
- Once dry, let the toddler peel animal stickers and press them onto the painted background wherever they want.
- Optional: use a black marker to add simple ground lines or grass details around the animals.
11. Paper Bowl Sticker Turtle Shell
Paper bowls make the perfect turtle shell shape because they’re already round and dome-shaped. The toddler fills the outside of the bowl with green stickers in different shades to make the shell pattern, then you add a simple head and legs cut from green foam or construction paper.
Supplies
- 1 white paper bowl (standard soup bowl size)
- Green stickers in assorted shades — dark green, light green, and yellow-green hexagon or square shapes
- Green foam sheet or green construction paper (for the head, legs, and tail)
- Scissors (adult help for cutting the foam)
- Tape or glue stick
- 2 small googly eyes
- Black marker
How to Make It
- Flip the paper bowl upside down so the dome faces up — this is the turtle shell.
- Let the toddler cover the dome with green stickers, mixing the different shades to make a patchwork shell pattern.
- While they sticker, ask a grown-up to cut an oval head, four leg shapes, and a small tail from the green foam sheet.
- Tape or glue the head, legs, and tail around the rim of the upside-down bowl so they stick out from underneath the shell.
- Glue two googly eyes onto the head and draw a smile with a black marker.
10. Sticker Resist Art on Watercolor Paper
This one is genuinely cool to watch happen. You put stickers on watercolor paper first, paint over everything with watercolors, and then when the paint dries you peel the stickers off — and the shapes underneath are still white. It looks like a real art technique, and toddlers are always surprised when the stickers come off.
Mom helped us with making sure the paint wasn’t too watery the first time we tried it, because if it’s too thin it sneaks under the stickers and ruins the resist effect. Medium thickness is the key.
Supplies
- 1 sheet of watercolor paper (at least 90 lb weight — regular copy paper gets too soggy)
- Star, circle, and heart sticker shapes — solid stickers work best (not transparent)
- Watercolor paint set — at least 3 colors (we used blue, purple, and pink)
- A medium paintbrush (size 6 or 8 round brush)
- Cup of water for rinsing the brush
- Paper towel
How to Make It
- Press solid sticker shapes firmly all over the watercolor paper — stars, circles, and hearts spread across the page. Press the edges down hard so no gaps are left.
- Mix watercolors to a medium thickness — not too watery, not too thick and pasty.
- Paint over the entire paper, stickers and all, using big sweeping strokes. Mix colors as you go for a gradient effect.
- Let the paint dry completely — at least 30 minutes, or until the paper feels dry to the touch.
- Peel the stickers off slowly to reveal the white shapes underneath.
9. Egg Carton Sticker Caterpillar Craft
An egg carton makes the perfect caterpillar body — all those bumps are already there, you just have to decorate them. Toddlers go wild covering each section with different stickers, and no two caterpillars ever look the same.
Supplies
- 1 egg carton (12-count), cut in half lengthwise so you have a row of 6 bumps
- Green paint (washable tempera) — optional base coat
- Round stickers in assorted colors (about 1 inch diameter work great)
- Star stickers, dot stickers, and smiley face stickers for variety
- 2 googly eyes (about 3/4 inch wide)
- 2 green pipe cleaners for antennae
- White craft glue
How to Make It
- If you want a green caterpillar, paint the outside of the egg carton strip with green tempera paint and let it dry completely — about 20 minutes. You can skip this step and go straight to stickers if you want.
- Press stickers all over the top and sides of each egg carton bump. Mix colors and shapes — there’s no wrong way to do this part.
- On the very first bump (the head), glue on 2 googly eyes using white craft glue. Hold them for a few seconds so they stick.
- Poke 2 small holes in the top of the head bump using a pencil tip. Push one green pipe cleaner through each hole and bend the tops into little curls for antennae.
- Let everything dry for about 15 minutes before picking it up to play with it.
8. Sticker Decorated Cardboard Crown Hat
Yousuf made one of these and wore it for literally three days straight — he even tried to wear it to bed. You cut the crown shape and your toddler goes to town with the stickers, so it’s almost completely independent once the base is ready.
Supplies
- 1 large cereal box or piece of stiff cardboard, at least 20 inches long and 6 inches wide
- Scissors (Mom cuts the zigzag crown points)
- Gold or yellow paint (washable tempera) for the base color
- Foam stickers in jewel shapes — diamonds, circles, hearts (the puffy kind work best)
- Round dot stickers in red, green, blue, and purple to look like gems
- A stapler or strong tape to close the crown into a circle
- A ruler and pencil for measuring
How to Make It
- Measure and cut the cardboard into a strip about 20 inches long and 6 inches wide. Use a pencil to draw zigzag points along the top edge — about 5 or 6 points total.
- Have a grown-up cut along the zigzag line with scissors. This part needs sharp scissors, so Mom handles it.
- Paint the whole crown strip with gold or yellow tempera paint. Let it dry fully — at least 30 minutes.
- Once dry, hand it to your toddler and let them press foam jewel stickers and dot stickers all over the crown however they want. No rules here.
- Wrap the strip around the child’s head to check sizing, then staple or tape the two ends together to form a circle.
7. Paper Strip Sticker Woven Bookmark
Okay, the weaving part is something you set up for them, but stickering the finished bookmark is totally a toddler job. These turn out really colorful and flat so they actually work as real bookmarks — I made a bunch and gave them to my teacher.
Supplies
- 3 strips of cardstock in different colors — red, blue, and yellow — each about 1 inch wide and 8 inches long
- 1 strip of white cardstock, 2 inches wide and 8 inches long (this is the base)
- Scissors
- A glue stick
- Small round sticker dots in assorted colors (about 1/2 inch diameter)
- Star stickers and heart stickers for extra decoration
- Clear tape (optional, to seal the ends)
How to Make It
- Take the white cardstock strip and cut 3 evenly spaced slits across the width — cut from one long edge almost to the other but stop about half an inch from the edge so the strip stays in one piece.
- Weave the red strip over and under through the slits, then the blue strip, then the yellow strip, sliding them snug against each other.
- Dab a little glue stick on the ends of each woven strip and press them flat so nothing slides out.
- Let the glue dry for about 10 minutes, then hand the bookmark to your toddler and let them press small dot stickers, star stickers, and heart stickers all over both sides.
- Optional: run a piece of clear tape along each short end to keep everything extra secure.
6. Sticker Mural on Large Butcher Paper
Roll out a big piece of butcher paper on the floor and just let your toddler go. This one is less about making a specific thing and more about giving them a giant canvas to fill with stickers — and the end result always looks awesome hung on a wall.
Supplies
- 1 large sheet of white butcher paper, about 3 feet long (or tape several pieces of regular white paper together)
- Painter’s tape to secure the paper to the floor or a low table
- Assorted sticker sheets — animals, shapes, letters, dots, stars, whatever you have
- Foam stickers in big bold shapes (flowers, hearts, clouds work well)
- Markers in thick colors (optional — toddler can draw between stickers too)
How to Make It
- Tape the butcher paper to a hard floor or low table using painter’s tape on all four corners so it doesn’t slide around.
- Spread out the sticker sheets nearby in a way your toddler can easily reach and peel them.
- Let your toddler fill the paper however they want — stickers anywhere, as many or as few as they like. There’s no plan here, which is kind of the whole point.
- If you’re using markers too, let them draw roads, grass, sky, or whatever between sticker sections.
- When the paper is as full as they want it, carefully peel off the painter’s tape and hang the mural on a wall with tape or a few push pins.
5. Toilet Roll Sticker Totem Pole
Stack a few toilet paper rolls on top of each other and you basically have a totem pole waiting to happen. Each roll can be a different character or animal face, and stickers do all the decorating work — no drawing skills needed at all.
Supplies
- 3 empty toilet paper rolls
- Strong craft glue or hot glue (hot glue is for grown-ups — Mom handles this part)
- Washable tempera paint in 3 different colors — red, orange, and yellow — one for each roll
- Foam animal stickers (owls, frogs, bears work well for totem pole faces)
- Large googly eyes, 3/4 inch wide, 2 per roll (so 6 total)
- Craft glue for the googly eyes
- Small feather stickers or actual craft feathers for the top
How to Make It
- Paint each toilet roll a different color — one red, one orange, one yellow. Stand them upright to dry for about 20 minutes.
- Once dry, have a grown-up use hot glue to stack and attach the three rolls on top of each other, largest on the bottom. Let the glue set for a few minutes.
- Give the stacked totem pole to your toddler. Let them press foam animal stickers onto each section and glue on 2 googly eyes per roll using craft glue.
- Press feather stickers or craft feathers into the top opening of the uppermost roll for a traditional totem pole look.
- Stand the totem pole upright and let everything dry completely before moving it around.
4. Sticker Decorated Smooth River Rocks
Rocks are honestly a perfect craft surface for toddlers — they don’t move around, they’re satisfying to hold, and stickers stick to them really well if the rock is clean and dry. These end up looking like little decorative stones you’d actually want to keep on a shelf.
Supplies
- 4-6 smooth river rocks, each about the size of a palm (wash and dry completely before starting)
- White paint (washable tempera) to prime the rock surface — optional but makes colors pop
- Round dot stickers in bright colors — red, yellow, blue, green, and orange
- Star stickers and small heart stickers
- Foam stickers in flower or sun shapes
- Mod Podge or clear school glue watered down 50/50 (a grown-up can brush this on at the end to seal)
- A foam brush for the sealant coat
How to Make It
- Make sure all rocks are completely clean and dry. If you want the stickers to really stand out, paint each rock with one coat of white tempera and let it dry for 20 minutes.
- Set the rocks on the table in front of your toddler and open up the sticker sheets. Let them press dot stickers, star stickers, heart stickers, and foam flower stickers all over each rock however they like.
- Cover as much or as little of each rock as they want — some kids do two stickers per rock, some do twenty. Both look cool.
- Once they’re done stickering, brush a thin coat of watered-down Mod Podge or school glue over each rock using a foam brush. This seals the stickers so they don’t peel off later.
- Let the rocks dry flat for about an hour before touching them. Display them on a windowsill or shelf.
3. Paper Plate Sticker Mandala Design
A mandala sounds fancy but really it just means putting stickers in circles going outward from the middle — toddlers can totally do a version of this and the round paper plate is already the perfect shape to work with. The first time I tried to explain this to Yousuf, he just started slapping stickers everywhere, and it still looked like a mandala so honestly that’s good enough.
Supplies
- 1 white paper plate (standard 9-inch size)
- 1 large round sticker or foam dot in a bright color for the center (about 1.5 inches wide)
- Round dot stickers in 4 colors — red, blue, yellow, and green (about 3/4 inch diameter)
- Small gold or silver star stickers
- Flower foam stickers in pink and purple (about 1 inch wide)
- A pencil to lightly draw circle guides if needed (optional)
How to Make It
- Place the paper plate flat on the table. Press one large round foam dot right in the very center of the plate — this is the middle of the mandala.
- Around the center dot, press a ring of red dot stickers evenly spaced in a circle — about 6 stickers going around it.
- Press a second ring of blue dot stickers just outside the red ring, spacing them between the red ones.
- Add a third ring using pink and purple foam flower stickers, pressing them evenly around the outside of the blue ring.
- Fill any remaining space near the edge of the plate with gold and silver star stickers. Step back and look — it should have a circular, patterned effect even if it’s not perfectly even.
2. Cereal Box Sticker Dollhouse Wall
Cut open a cereal box flat, flip it to the plain brown inside, and you’ve got a giant blank wall for a dollhouse scene — toddlers use stickers to make furniture, windows, rugs, and decorations. It’s basically pretend play and craft in one, which means it keeps them busy for way longer than most crafts.
Supplies
- 1 large cereal box (family size works best), cut open and laid flat with the plain brown/grey interior side facing up
- Light blue or cream paint (washable tempera) to paint the “wall” color
- Foam stickers in furniture shapes — couches, lamps, picture frames (these come in craft store sticker packs)
- Square and rectangle stickers in solid colors to represent windows, doors, and rugs
- Flower stickers and butterfly stickers for wall decorations
- Round dot stickers in dark colors for doorknobs and light switches
- A foam brush for painting the base coat
How to Make It
- Cut the cereal box open along its seams and lay it flat, plain side facing up. Trim any flaps so you have one clean rectangular piece.
- Paint the entire surface with light blue or cream tempera paint using a foam brush. This is the room’s wall color. Let it dry for about 25 minutes.
- Once dry, set the painted cardboard in front of your toddler. Let them press furniture foam stickers onto the lower half of the surface to represent things sitting on the floor.
- On the upper half, let them add rectangle stickers for windows, flower and butterfly stickers as wall art, and dot stickers as doorknobs or light fixtures.
- Press any remaining stickers wherever they like to finish the room scene. Prop the finished dollhouse wall against a book or wall so it stands slightly upright for play.
1. Sticker Patterned Paper Pinwheel Spinner
Pinwheels look so cool spinning in the wind, and I honestly didn’t know toddlers could help make them until Yousuf decorated one all by himself with stickers and it actually turned out really cute. The stickers are what make this one special — they add color and pattern without needing any painting or drawing skills, so even little hands can make it look great.
Supplies
- 1 sheet of bright colored cardstock, 6×6 inches (I used yellow, but any color works)
- Assorted round and star stickers in multiple colors
- Scissors (grown-up cuts the diagonal slits)
- 1 brass brad/paper fastener
- 1 wooden dowel or unsharpened pencil
- Clear tape
- Ruler and pencil (for marking the center)
How to Make It
- Let the toddler cover the whole 6×6 cardstock square with stickers — dots, stars, whatever they want. The more the better, honestly.
- A grown-up uses a ruler to find the exact center of the square and marks it lightly with a pencil, then draws diagonal lines from each corner stopping about 1 inch from the center.
- A grown-up cuts along those diagonal lines with scissors to create 4 triangle flaps, being careful not to cut all the way to the middle.
- Fold every other corner tip into the center (just 4 of the 8 tips) and hold them in place — don’t crease them, just curve them gently in.
- Push a brass brad through all 4 folded tips and through the center of the square, then open the brad legs on the back to hold everything together.
- Tape or tie the brad to the top of a wooden dowel or unsharpened pencil, and give it a blow to watch it spin.
Okay so if I had to pick just one craft from this whole list to start with, I’d say go with the sticker rainbow — it’s fast, it looks really good when it’s done, and even Yousuf was able to finish his without asking me for help once. That’s kind of the whole point of this list honestly. These are crafts where kids can actually do it themselves and feel proud at the end, not just hand it to a grown-up to fix.
The thing I like most about sticker crafts is that there’s basically no mess. Like, no paint on the table, no glue strings everywhere, no waiting for stuff to dry. You just peel and stick. Mom actually loves these because she doesn’t have to supervise the whole time. She can be in the other room and everything is totally fine. I think that’s why these work so well for toddlers especially — they get to be independent and the grown-ups don’t have to stress about cleanup or safety stuff.
I’ve made a lot of crafts on this blog, and sticker crafts are honestly some of my favorites to recommend to younger kids. If your toddler has never done a craft on their own before, start with something simple from the top of this list. Once they get the hang of peeling stickers, they’ll want to make everything. Yousuf went through like three full sheets of stickers in one afternoon when we first started doing these, which was a lot, but he was SO happy with everything he made. That’s really what crafting is all about.
🎨 ✨ 🌈
More Crafts You Might Like
- Paper Plate Crafts Toddlers Can Actually Do
- Easy Crafts for 3-Year-Olds (No Mess, No Stress)
- Construction Paper Crafts for Kids of All Ages
- Popsicle Stick Crafts That Toddlers Love
- Rainy Day Crafts to Keep Kids Busy for Hours
Questions Other Kids and Moms Asked Me
Can toddlers really do these crafts without help?
Most of them, yes. That was kind of the whole reason I put this list together. Stickers are easy for little hands to use, and you don’t need scissors or glue or anything sharp. Some of the crafts near the end of the list are a tiny bit trickier, but the first half is totally doable for a 2 or 3-year-old on their own. Yousuf is 5 and he did most of these without me helping at all.
What kind of stickers work best for these crafts?
Regular dot stickers and foam stickers are the easiest for toddlers to peel. The really tiny stickers can be frustrating because little fingers have a hard time getting them off the sheet. I’d go with the bigger dot stickers or the puffy foam ones — they stick well and they’re easy to grab. You can get them at any dollar store or craft store.
How long do most of these crafts take?
Most of them take maybe 10 to 20 minutes, which is pretty perfect for toddlers because they don’t have a super long attention span. A few of the more detailed ones might take closer to 30 minutes if your kid is really into it and wants to cover every single inch with stickers (Yousuf definitely does this). But nothing on this list takes a whole afternoon, which is nice.
Do I need to buy special supplies or is this stuff I already have?
Mostly stuff you already have or stuff that’s really cheap to get. A lot of these crafts just need stickers, paper, and maybe some markers or construction paper. I use recycled stuff a lot too — cardboard tubes, paper plates, cardboard boxes. The stickers are really the main thing you need, and you can get a huge pack for like a dollar or two.
Which craft from this list is your favorite, Waresha?
Honestly the sticker rainbow is my favorite because it looks SO good and it’s one of the simplest ones. I also really like the sticker collage on black paper because the colors pop so much and even a toddler’s version looks really cool. If you’re making these with a little kid and want something that’s going to make them super proud of themselves, start with one of those two.